

 Manufacturers
TE CONNECTIVITY 1-601827-2

Description
Repl Blades For 601827-2
1-601827-2
Part Number
1-601827-2
Price
Request Quote
Manufacturer
TE CONNECTIVITY
Lead Time
Request Quote
Category
Fasteners, Hardware and Fluid Transfer » Hardware Tools
Specifications
Manufacturer
TE Connectivity
Manufacturers Part #
1-601827-2
Industry Aliases
1-601827-2
Sub-Category
Hardware Tools
Brand
AMP
Factory Pack Quantity
1
Datasheet
DDEController?Action=showdoc&DocId=Specification+Or+Standard%7F408-2766%7FD%7Fpdf%7FEnglish%7FENG_SS_408-2766_D.pdf
1025 KiB

Extracted Text
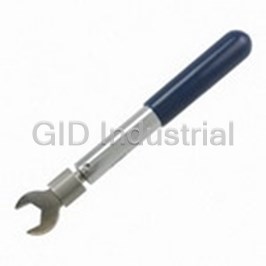
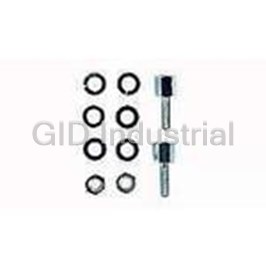
Instruction Sheet Coaxial Cable Stripper 408-2766 Kits 603995-[ ] 09 OCT 15 Rev E PROPER USE GUIDELINES Cumulative Trauma Disorders can result from the prolonged use of manually powered hand tools. Hand tools are intended for occasional use and low volume applications. A wide selection of powered application equipment for extended-use, production operations is available. Coaxial Cable Gauge Stripping Tool Cassette V-Block Figure 1 1. INTRODUCTION Coaxial Cable Stripper Kits 603995-1 through -6 are capable of cutting and stripping five different sequential settings on three different areas of various coaxial cable sizes; see Figure 2. This sheet covers the cutting and stripping of the cable, the installation of new cutting blades, cassettes, adjustment gauge, V-blocks used for the various cable sizes, and adjustments and troubleshooting. See Figure 1. NOTE Dimensions on this document are in metric units [with U.S. customary units in brackets]. Figures and illustrations are for reference only and are not drawn to scale. CAUTION Do NOT use stripping tool on coaxial cables with drain wires. CAUTION A 3-step tool is not recommended for most styles of RG-62 cable, nor for many cable styles with cellular polyethylene or other soft dielectrics. Use 2-step tool instead. Read these instructions thoroughly before using the tool. Reasons for revisions to this document are provided in Section 9, REVISION SUMMARY. 2-Blade Cassette 3-Blade Cassette Makes 2-Step Strip Makes 3-Step Strip B A■ C B A■ V-Block (Four V-Blocks Cassette Included in Each Kit. See Figure 11 for Size and Color ■For “A” dimension, refer to the instruction sheet for your specific product. COAXIAL CABLE STRIPPER KIT BRAID STRIP DIMENSION CASSETTE CABLE DIA PRODUCT COLOR RANGE STYLE PART NO. “B” “C” 603995-1 Red 6 [.24] --- Single Crimp BNC 2-Step 603995-2 Blue 6.8 [.27] --- Commercial BNC 2.54-7.62 603995-3 Yellow 12 [.48] --- UHF [.100-.300] 603995-5 Black 5.5 [.22] 5.5 [.22] Dual Crimp BNC 3-Step 603995-6 White 2.5 [.10] 6.8 [.27] Dual Crimp Commercial BNC Figure 2 © 2015 TE Connectivity family of companies PRODUCT INFORMATION 1-800-522-6752 This controlled document is subject to change. 1 of 9 All Rights Reserved For latest revision and Regional Customer Service, *Trademark visit our website at www.te.com. TE Connectivity, TE connectivity (logo), and TE (logo) are trademarks. Other logos, product, and/or company names may be trademarks of their respective owners. ORIGINAL INSTRUCTIONS 408-2766 2. DESCRIPTION The Coaxial Cable Stripping Tool automatically strips coaxial cable with jacket diameter of 2.54 to 7.62 mm [.100 to .300 in.], with minor adjustments. Shipped with the tool is one color-coded cassette, four V-blocks and a hex wrench. Kits come in two styles: a 2-step kit for 2-step stripping, and a 3-step kit for either 2-step or 3-step stripping. (The 3-step kit will accommodate both 2-step and 3-step cassettes.) Cassettes have pre-set strip lengths. Refer to instruction material for your connector to determine your strip requirements, then refer to Figure 2 to find which cassette meets your strip requirements. Note the parts of the coaxial cable stripping tool in Figure 3. Numbers 1 and 2 Imprinted Inside Cassette Cassette Slide Locking Latch V-Block Figure 3 3. STRIPPING PROCEDURE Follow these steps when stripping with the Coaxial Cable Stripping Tool: 1. Adjust slide to position 4 or 5. 2. Open tool by rotating locking latch downward, as shown in Figure 4. 3. Mark jacket of cable for center conductor length. (If you have a simple wire cutter, ignore this instruction. You can cut center conductor to length after the strip or use conductor stop C-ST). 4. Hold the tool with the handle toward you and insert cable from left into the groove position. Close and latch tool. See Figures 5 and 6. AMP Figure 4 2 of 9 Rev E 408-2766 Mark on Cable Positioned Over Blade Figure 5 Figure 6 RECOMMENDED SETTINGS COAXIAL CABLE V-BLOCK SLIDE POSITIONS RG-58 Blue 3, 2, 1 RG 59, 62 Blue 5, 4, 3 RG 174, 188, 316 White 4, 3 RG 6 Yellow 5, 4, 3 BELDEN 8281 Yellow 5, 4 RG 195, 180 Red 4, 3, 2 Figure 7 5. Push slide forward to appropriate start position (see Figure 7). Make sure proper V-block is installed. 6. Rotate tool around cable about five times (see Figure 8). Push slide forward to next position in sequence. Rotate tool again. Then push slide forward to final position and rotate tool final five times. 7. Move slide back one position. Then pull cable out carefully while squeezing tool (see Figure 9). If there is too much resistance or strip is imperfect, refer to Section 4. 3 of 9 Rev E 408-2766 Figure 8 Figure 9 4. ADJUSTING THE TOOL 1. Inspect your first strip. Determine how deeply each blade has scored the cable. See Figure 10 for the proper direction you may have to adjust. 2. Adjust blade depth to match your cable by turning hex screws at base of tool (see Figure 10). Hex Wrench Turn Hex Screws Clockwise (+) to Increase the Cut A Turn Hex Screws Counterclockwise (-) B to Lessen the Cut Figure 10 4 of 9 Rev E 408-2766 NOTE If a blade is near its proper depth, turn its screw approximately one-quarter turn (±90°). If a blade is farther from its proper depth, turn its screw approximately three-quarter (±270°) to one complete turn (±360°). NOTE Adjust tool so that the appropriate slide progression works correctly (see Figure 7); develop your own 2- or 3- stage sliding sequence. 3. Try stripping again per Section 3, following Steps 1 through 7. If strip is still not acceptable, adjust blades again, following instructions in Steps 1 and 2. 5. SOLUTIONS TO TYPICAL PROBLEMS If braid is twisting too much, turn hex screw to increase cut of braid-cutting blade one-quarter turn CLOCKWISE (+90°), and turn hex screw for jacket-cutting blade one quarter turn COUNTERCLOCKWISE (-90°). If, after repeated adjustment, most of the braid will not cut properly, the blade set is probably worn out. Reverse cassette to try new blade set. With RG-174 or other very thin cable, very fine adjustment is needed. Expect to make several small adjustments, approximately one-twelfth turn (±30°), to reach proper blade depth. Use a fresh blade set. Use only high quality thin cable. 6. REPLACEMENTS 6.1. Replacement V-Block Selection Select proper V-block by outside diameter of wire (see Figure 11). V-BLOCK PART NUMBER CABLE OUTSIDE DIAMETER COLOR 603997-1 3.0-5.0 [.12-.20] Red 603997-2 5.0-6.4 [.20-.25] Blue 603997-3 6.4-7.6 [.25-.30] Yellow 603997-4 2.5-3.0 [.10-.12] White Figure 11 6.2. Changing V-Block 1. Open tool fully (Figure 12) until the springs holding V-block release. 2. Pull out V-block and replace with selected V-block. NOTE With white V-block, you must position springs in holes. V-Block Spring Figure 12 5 of 9 Rev E 408-2766 6.3. Cassettes Each cassette contains 2 sets of cutting edges. Cassette can be reversed each time a blade set wears out. Numbers 1 and 2 are printed inside cassette to determine usage. To Change or Reverse Cassette Move locking latch in direction of arrow, then push cassette out of tool by inserting wrench through hole in bottom of tool. Figure 13. Numbers 1 and 2 Imprinted Inside Cassette (Flip Side) Locking Latch Figure 13 Step Strip with 2-Bladed Cassette This procedure is recommended only in those cases where the 3-step strip you require is not available in one of the standard Series cassettes. If your required strip length is as shown in Figure 14A, choose the 2-step cassette that matches your “C” dimension. Mark cable at length “A+B” from end. Figure 14B. 1. Open tool, insert cable from left, and locate mark on cable over the right hand blade. 2. Close and latch tool and strip cable according to Section 3. NOTE An adjustment of the tool might be necessary. A correct strip is shown in Figure 14C. 3. Mark exposed dielectric at length “A” from end. 14A 14B 14C Mark Exposed Dielectric Here C B A C B A A + B Figure 14 4. Remove dielectric at the mark with a simple wire stripping plier. See Figure 15. 6 of 9 Rev E 408-2766 Figure 15 The slide is a unique and important part of the stripper. The slide allows you to ease the blades into the cable, reducing the friction on the braid and dielectric as you strip. NOTE Always use your slide when you strip. Adjust your tool for the appropriate slide progression. If your cable size does not appear in Figure 7, develop your own 2-or 3-stage sliding sequence. NOTE Always step back to position 1 on slide before pulling out of tool. 7. ADJUSTMENT GAUGE 7.1. Opening the Tool and Retracting Adjustment Screws 1. Open the tool by rotating locking latch downward as shown in Figure 16. Figure 16 2. Push the cassette out of the tool by inserting the wrench, or appropriate object, through hole in the bottom of the tool. See Figure 17. Turn blade adjustment screws counterclockwise until they are fully retracted. See Figure 10. 7 of 9 Rev E 408-2766 Figure 17 7.2. Installation of Adjustment Gauge The gauge is marked with different cable types. Install gauge so that the markings, which correspond to the cable type to be stripped, are above the adjustment screws; see Figure 18. Close the tool. Gauge Figure 18 7.3. Screw Adjustment 1. Rotate the blade adjustment screws (A or B) clockwise until they touch the gauge; see Figure 19. 2. Open the tool and remove the gauge. 3. Install the cassette, and the tool is now ready for use. Blade Adjustment Hex Screws A B Figure 19 8 of 9 Rev E 408-2766 8. REPLACEMENT PARTS Customer-replaceable parts are listed in Figure 11. Parts other than those listed should be replaced by TE to ensure quality and reliability. For customer repair service or to order replacement parts, call 1-800-522-6752, or fax your purchase order to 717-986-7605, or write to: Customer Service (038-035), Tyco Electronics Corporation, PO Box 3608, Harrisburg, PA 17105-3608. 9. REVISION SUMMARY Updated document to corporate requirements Deleted part numbers in table in Figure 2 Combined Figures 14, 15, and 16 and renumbered Deleted referenced Figure 2 from Section 6 9 of 9 Rev E
Frequently asked questions
How does Electronics Finder differ from its competitors?

Is there a warranty for the 1-601827-2?
Which carrier will Electronics Finder use to ship my parts?
Can I buy parts from Electronics Finder if I am outside the USA?
Which payment methods does Electronics Finder accept?
Why buy from GID?

Quality
We are industry veterans who take pride in our work

Protection
Avoid the dangers of risky trading in the gray market

Access
Our network of suppliers is ready and at your disposal

Savings
Maintain legacy systems to prevent costly downtime

Speed
Time is of the essence, and we are respectful of yours
Related Products

Crimpers TOOL 1055236-1
Mini Torque Wrenches 1055258-1

Wrenches 2098 0351 54 1055276-1
Hand Tools CABLE BENDER 1055479-1
Connector Accessories Crimp Assembly Kit 1055779-1
Crimpers TOOL 1055835-1
Request a Quote

The quote request has been received
Close

Facing challenges or have inquiries? Feel free to contact us!
Call Us +1-469-283-2440
What they say about us
FANTASTIC RESOURCE
One of our top priorities is maintaining our business with precision, and we are constantly looking for affiliates that can help us achieve our goal. With the aid of GID Industrial, our obsolete product management has never been more efficient. They have been a great resource to our company, and have quickly become a go-to supplier on our list!
Bucher Emhart Glass
EXCELLENT SERVICE
With our strict fundamentals and high expectations, we were surprised when we came across GID Industrial and their competitive pricing. When we approached them with our issue, they were incredibly confident in being able to provide us with a seamless solution at the best price for us. GID Industrial quickly understood our needs and provided us with excellent service, as well as fully tested product to ensure what we received would be the right fit for our company.
Fuji
HARD TO FIND A BETTER PROVIDER
Our company provides services to aid in the manufacture of technological products, such as semiconductors and flat panel displays, and often searching for distributors of obsolete product we require can waste time and money. Finding GID Industrial proved to be a great asset to our company, with cost effective solutions and superior knowledge on all of their materials, it’d be hard to find a better provider of obsolete or hard to find products.
Applied Materials
CONSISTENTLY DELIVERS QUALITY SOLUTIONS
Over the years, the equipment used in our company becomes discontinued, but they’re still of great use to us and our customers. Once these products are no longer available through the manufacturer, finding a reliable, quick supplier is a necessity, and luckily for us, GID Industrial has provided the most trustworthy, quality solutions to our obsolete component needs.
Nidec Vamco
TERRIFIC RESOURCE
This company has been a terrific help to us (I work for Trican Well Service) in sourcing the Micron Ram Memory we needed for our Siemens computers. Great service! And great pricing! I know when the product is shipping and when it will arrive, all the way through the ordering process.
Trican Well Service
GO TO SOURCE
When I can't find an obsolete part, I first call GID and they'll come up with my parts every time. Great customer service and follow up as well. Scott emails me from time to time to touch base and see if we're having trouble finding something.....which is often with our 25 yr old equipment.
ConAgra Foods