

 Manufacturers
TE CONNECTIVITY 58075-1

Description
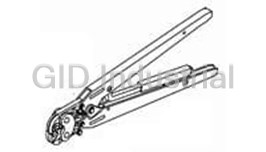
Assembly Tools, High Density Connector Terminating Head
Pistol Grip Pneumatic Handle Assembly
Part Number
58075-1
Price
Request Quote
Manufacturer
TE CONNECTIVITY
Lead Time
Request Quote
Category
Tools and Supplies » Assembly Tools
Specifications
Manufacturer
TE Connectivity
Manufacturers Part #
58075-1
Industry Aliases
58075-1
Sub-Category
Electronics Assembly Tools
Brand
AMP
Factory Pack Quantity
1
Datasheet
DDEController?Action=showdoc&DocId=Specification+Or+Standard%7F408-9414%7FA%7Fpdf%7FEnglish%7FENG_SS_408-9414_A.pdf
141 KiB

Extracted Text
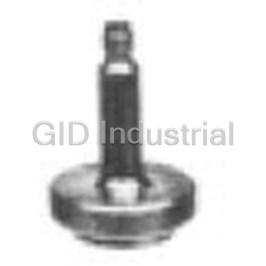
Instruction Sheet TerminatingHead58063-2 ForAMPLIMITE*HighDensity(HDE)-20 408--9414 Connectors 20DEC 10 RevB Wire Guide Anti--Backup Pawl Wire Inserter Feed Slide Adjuster (Inserter Rod) Feed Channel Figure 1 Adjuster (inserter rod)—is a piston for, and regulates 1. INTRODUCTION the travel of, the wire inserter. Terminating Head 58063--2 is designed to terminate unstripped discrete wire sizes 30 through 20 AWG Feed slide—automatically advances the connector after each termination. onto AMPLIMITE HDE--20 all plastic connectors (reference part number 745203--2) and metal shell Anti--backup pawl—prevents the connector from connectors (reference part number 745492--2). These moving out of position after it has been advanced by connectors contain insulation displacement contacts. the feed slide. The head must be used with one of the following After the head is installed onto the power unit, it power units (for operating procedure, refer to the serves as a guide and support for the connector instructions packaged with the power unit). during termination. The arrow on the top of the head InstructionSheet(408)or indicates the direction that the connector will move in PowerUnit CustomerManual(409) the head. The wires are terminated onto the connector using the insulation displacement PistolGripManualHandle 408--6790 technique. Assembly58074--1 PistolGripPneumaticHandle 3. TERMINATIONPROCEDURE 408--6789 Assembly58075--1 Make sure that the connector matches the wire size PneumaticPower Bench 408--9393 to be terminated, then refer to Figure 2, and proceed Assembly58338--1 as follows: ElectricPower Unit931800--1 409--5746 1. Align the side of the connector with the side of the head (so that it will move in the direction of the Dimensions in this instruction sheet are in metric NOTE arrow), and slowly slide the connector into the feed units [with U.S. customary units in brackets]. channel. Stop when the desired contact position Figures are not drawn to scale. aligns with the wire slot. i If the connector cannot be inserted into the head NOTE Reasons for reissue of this instruction sheet are or if the connector is too loose in the head, refer provided in Section 7, REVISION SUMMARY. to Paragraph 4.2 for wire guide adjustment. i 2. DESCRIPTION (Figure1) 2. Insert the wire into the wire slot until the wire Features of the head and their function are as follows: bottoms on the head. Wire inserter—forces the wire into the slotted beams 3. Center the wire in the wire slot, then actuate the of the contact. power unit until the wire inserter bottoms (the wire Wire guide—holds the connector properly in relation inserter will retract, and the connector will advance to the wire. to the next contact position). E2010TycoElectronics Corporation, Berwyn, PA TOOLING ASSISTANCE CENTER1--800--722--1111 This controlleddocument is subject tochange. 1 of 4 PRODUCT INFORMATION1--800--522--6752 Forlatest revisionandRegional CustomerService, All Rights Reserved visit ourwebsiteatwww.tycoelectronics.com TE logoandTycoElectronics aretrademarks. LOCB *Trademark. Otherproducts names, logos, orcompany names might betrademarks of theirrespectiveowners. ORIGINAL INSTRUCTIONS 408-9414 TerminatingHead58063-2 Terminating Connector B. ManualandElectricPowerUnits Wire To prevent personal injury when using electric DANGER Wire Slot power units, ALWAYS disconnect the electrical Connector power supply before making any adjustments. Power Unit (Ref) 1. Remove the head from the power unit according to the instructions packaged with the power unit. Make sure to observe any cautions and dangers. 2. Turn the adjuster (inserter rod) one--sixth of a revolution clockwise if the wire is too deep in the contact, and counterclockwise if the wire is not deep enough in the contact. Refer to Figure 3. This Slide Connector will decrease or increase the wire insertion depth Into Feed Channel by approximately 0.20 mm [.008 in.]. 3. Install the head onto the power unit according to Figure 2 the instructions packaged with the power unit. Make sure to observe any cautions and dangers. 4. Repeat Steps 2 and 3 until all applicable contacts are terminated. Wire Insertion Depth Adjustment 5. Slide the connector out of the head in the direction of the arrow. 6. Inspect each terminated contact according to Turn CLOCKWISE Figure 4. If any contact does not meet the To Decrease requirements, DO NOT use the connector. Refer to Wire Insertion Depth Section 4 for adjustments. For application requirements for the connectors, NOTE refer to application specification 114--40002. For assembly procedure, refer to 408--6621 for i all plastic connectors and 408--6645 for metal Turn COUNTERCLOCKWISE Adjuster shell connectors. To Increase (Inserter Rod) Wire Insertion Depth 4. ADJUSTMENTS Figure 3 4.1. WireInsertionDepth If the wire is inserted too deep or not deep enough in 4.2. WireGuide the contact after termination, adjust the wire insertion If the connector cannot be inserted into the head, the depth as follows: connector is too loose in the head, or the connector housing is damaged after termination, refer to Figure A. PneumaticPowerUnits 1, and adjust the wire guide as follows: To avoid personal injury when using pneumatic DANGER 1. For pneumatic power units, disconnect the air power units, ALWAYS disconnect the air supply supply. For electric power units, disconnect the before making any adjustments. electrical power supply. 2. Loosen the two screws on the wire guide. Increase the air pressure by 10 psi [69 kPa]. Repeat the termination and inspection procedure. Continue in 3. Slide the wire guide until the connector fits this manner until the proper wire insertion depth is properly in the head. obtained or the air pressure is set to 70 psi [483 kPa]. 4. Finger--tighten the screws. If proper wire insertion depth is not obtained at 70 psi [483 kPa], return the air pressure to 40 psi [276 kPa] 5. INSPECTIONANDMAINTENANCE and follow Paragraph B. 5.1. Inspection For pneumatic power units, it might be necessary NOTE to adjust either the air pressure or the adjuster Regular inspections should be performed by quality (inserter rod). control personnel with a record of quality control i inspections remaining with the personnel responsible 2 of 4 TycoElectronicsCorporation RevB 408-9414 TerminatingHead58063-2 Termination Inspection Correct Acceptable Arms of Insulation Support Arms of Insulation Support Barrel Partially Closed Barrel Completely Closed Section A--A 0.51 mm Centerline of [.020 in.] Conductor AMPLIMITE HDE--20 Min Receptacle Connector A A 0.84+0.10 mm [.033+.004 in.] Incorrect Damaged Housing— Wire Was Not Inserted Wire Was Inserted With Wire Was Not Inserted Wire Was Not Fully Connector Was Too Deep Enough During Too Much Force During Straight Before Inserted Before Tight or Too Loose in Termination Termination Termination Termination Head During Termination Figure 4 for the head. One inspection per month is the 2. Check for chipped, cracked, worn, or broken recommended frequency; however, operator training areas on the head. If damage is evident, repair or and skill, amount of use, working conditions, and replace the head. established company standards are all factors to be 6. REPLACEMENTANDREPAIR considered in establishing inspection frequency. Customer--replaceable parts are listed in Figure 5. 5.2. DailyMaintenance A complete inventory should be stocked and controlled to prevent lost time when replacement of 1. Remove dust, moisture, and other contaminants parts is necessary. Parts other than those listed with a clean, soft brush or lint--free cloth. DO NOT should be replaced by Tyco Electronics to ensure use objects that could damage the head. quality and reliability. Order replacement parts 2. Make sure that all components are in place and through your representative, or call 1--800--526--5142, properly secured. or send a facsimile of your purchase order to 717--986--7605, or write to: 3. Make sure that the mechanisms inside the head CUSTOMER SERVICE (038--035) function smoothly. TYCO ELECTRONICS CORPORATION 5.3. PeriodicMaintenance PO BOX 3608 HARRISBURG PA 17105--3608 1. Remove any accumulated film with a suitable cleaning agent that will not affect plastic. For customer repair service, call 1--800--526--5136. RevB TycoElectronicsCorporation 3 of 4 408-9414 TerminatingHead58063-2 A A 25.4 mm [1.0 in.] 2 8 7 9 6 3 Section A--A 10 44.45 mm [1.75 in.] 1 12 11 13 15 4 5 14 84.07 mm [3.31 in.] REPLACEMENTPARTS ITEM PARTNUMBER DESCRIPTION QTYPERHEAD 1 312331--1 HEAD 1 2 28593--1 SCREW,Self--Tapping 2 3 314011--1 HOUSING,Insert 1 4 314012--1 PAWL 1 5 1--23147--1 SPRING,Compression 2 6 312339--1 INSERTER,Wire 1 7 312340--1 GUIDE,Wire 1 8 4--23715--7 SCREW,Machine,4--40¢.750in.L 2 9 3--21028--2 PIN,SlottedSpring 1 10 312149--1 ADJUSTER (Inserter Rod) 1 11 22488--5 SPRING,Compression 1 12 312148--2 ROD,Inserter 1 13 314013--1 SLIDE,Feed 1 14 304580--0 PIN,Spirol 1 15 314014--1 PAWL,Locator 1 Figure 5 7. REVISIONSUMMARY S Corrected part number of Item 5 in Figure 5 Revisions to this instruction sheet include: S Updated instruction sheet to corporate requirements S Added Original Instructions to page 1 4 of 4 TycoElectronicsCorporation RevB
Frequently asked questions
How does Electronics Finder differ from its competitors?

Is there a warranty for the 58075-1?
Which carrier will Electronics Finder use to ship my parts?
Can I buy parts from Electronics Finder if I am outside the USA?
Which payment methods does Electronics Finder accept?
Why buy from GID?

Quality
We are industry veterans who take pride in our work

Protection
Avoid the dangers of risky trading in the gray market

Access
Our network of suppliers is ready and at your disposal

Savings
Maintain legacy systems to prevent costly downtime

Speed
Time is of the essence, and we are respectful of yours
Related Products

Torque Wrenches Are Used To Properly Install Or Disassemble The Connectors 1055419-1
Tool For RF Connectors 1055442-1
Tool For RF Connectors 1055443-1
Insertion Tool For RF Connectors 1055447-1
Insertion Tool For RF Connectors 1055448-1
Assembly Tools, Sma Right Angle Cable Plugs 1055451-1
Request a Quote

The quote request has been received
Close

Facing challenges or have inquiries? Feel free to contact us!
Call Us +1-469-283-2440
What they say about us
FANTASTIC RESOURCE
One of our top priorities is maintaining our business with precision, and we are constantly looking for affiliates that can help us achieve our goal. With the aid of GID Industrial, our obsolete product management has never been more efficient. They have been a great resource to our company, and have quickly become a go-to supplier on our list!
Bucher Emhart Glass
EXCELLENT SERVICE
With our strict fundamentals and high expectations, we were surprised when we came across GID Industrial and their competitive pricing. When we approached them with our issue, they were incredibly confident in being able to provide us with a seamless solution at the best price for us. GID Industrial quickly understood our needs and provided us with excellent service, as well as fully tested product to ensure what we received would be the right fit for our company.
Fuji
HARD TO FIND A BETTER PROVIDER
Our company provides services to aid in the manufacture of technological products, such as semiconductors and flat panel displays, and often searching for distributors of obsolete product we require can waste time and money. Finding GID Industrial proved to be a great asset to our company, with cost effective solutions and superior knowledge on all of their materials, it’d be hard to find a better provider of obsolete or hard to find products.
Applied Materials
CONSISTENTLY DELIVERS QUALITY SOLUTIONS
Over the years, the equipment used in our company becomes discontinued, but they’re still of great use to us and our customers. Once these products are no longer available through the manufacturer, finding a reliable, quick supplier is a necessity, and luckily for us, GID Industrial has provided the most trustworthy, quality solutions to our obsolete component needs.
Nidec Vamco
TERRIFIC RESOURCE
This company has been a terrific help to us (I work for Trican Well Service) in sourcing the Micron Ram Memory we needed for our Siemens computers. Great service! And great pricing! I know when the product is shipping and when it will arrive, all the way through the ordering process.
Trican Well Service
GO TO SOURCE
When I can't find an obsolete part, I first call GID and they'll come up with my parts every time. Great customer service and follow up as well. Scott emails me from time to time to touch base and see if we're having trouble finding something.....which is often with our 25 yr old equipment.
ConAgra Foods